Output Pass
Several types of output passes are supported, the default pass is Beauty which renders all the effects and features enabled. This attribute is very useful for tuning some final render properties and for multi-pass output. See Output Settings Node for more details on multi-pass rendering and output. These render passes are available:

NOTE: All output passes follow the same rules and use other render settings in the same way. It means it is possible to add blur or glow for example to any of the passes (which is not a good idea if the passes are to be combined in post processing) or if ambient occlusion pass is selected for example but global AO feature is disabled, nothing but white color will be output.
Output Bit Depth
Number of bits per channel for internal and output render buffers. Note that not all output file formats are able to handle all depths.
Render To Viewport
Enable or disable rendering to viewport.
Render Selection Set
Choose one from Maya sets to be connected with this render settings. If is selected 'no selection', then will be rendered all objects visible in scene, otherwise will be rendered only visible objects in selected set. Note that this attribute is used also for Isolate selected option.
Other Matte
If selected, objects other than those specified by the set set in Render Selection Set attribute, will be rendered as matte objects.
Alpha Objects Order
Semi transparent objects will be rendered in selected order.
Gamma & Light Correction
Options for gamma correction, useful for liner workflow.

Viewport Gamma Correction
Gamma correction for render to viewport. For gamma correction for output render see Output Settings Node. The gamma from Render Settings and the gamma from Output Settings will both be used in the output file image!
Material Gamma Correction
Inverse gamma correction for materials. Used to balance Viewport Gamma Correction.
Lights Gamma Correction
Inverse gamma correction for lights. Used to balance Viewport Gamma Correction.
Physically Correct
When enabled, primary light is reduced by amount of bounced light. That prevets unreal accumulating and multipling of light rays.
Raytracing
Ray Bias
Bias for raytracing. Can help remove artefacts in scenes of large or small scale.

Max Ray Length
Maximum distance that any ray can achieve. For example: two objects can not reflect or illuminate each other, if distance between them is bigger then radius attribute.
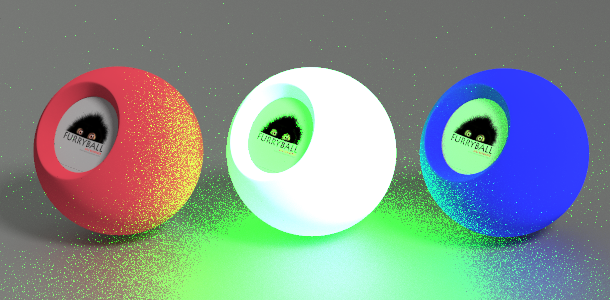
Max Ray Intensity
Maximal intensity value for each secondary rays in global illumination. It can be helpful if it in scene objects with large intensity. This intensity is distributed in scene and can cause very noisy results, which is very badly reduced by adding rays count. White dots problem
|
|
Max Ray Intensity 65535 (default) |
Max Ray Intensity 1 |
Intensity Multiplier
Intensity multipiler for raytracing, should stay on 1 for realistic results
Noise Seed
Seed value of noise pattern used for raytracing.
Light Threshold for Shadow Rays
Light threshold can be used for some speedup while tracing shadows rays in indirect lighting. Shadow rays will not be traced if light intensity is smaller than specified threshold (default is 0). You can also specify shadow intensity in this case.
Threshold
Light intensity threshold value. If light intensity is smaller than this value, shadow rays will not be traced.
Shadow Intensity
If shadow rays will not be traced, then use this intensity of shadow (0 means that light is not shadowed, otherwise 1 means that light is shadowed)-
Global illumination Node
Gi Node
Gi settings node linked to this render settings.
Create new GI node.
Create new GI node and link it to this render settings.
Created with the Personal Edition of HelpNDoc: Free HTML Help documentation generator